Metro UI Blogger Template

Posted by Unknown Minggu, 17 Februari 2013 0 komentar
News Magazine Blogger Template
Template Name: Metro UI Blogger Template
Platform: Blogger / Blogspot
Release date : 17, February 2013
Author : www.templateism.com
License : Creative Commons Attribution 3.0

Download Preview


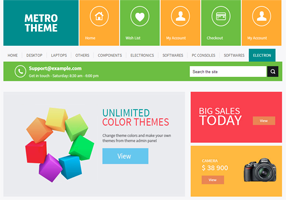
Metro UI is an innovative Windows 8 Style Blogger Template. This theme has a lot of similarities with the Microsoft’s latest operating system Windows 8. This template is ideal for blogging niche like technology, multimedia, entertainment, magazine, and etc. Nonetheless, that’s not all because it is robust enough to be used on any kind of website. By default, this theme has a greenish color scheme. However, you can customize the theme as per the needs. It has some built-in extra-ordinary features like Numbered page navigation, Elegant Menu, 4 column footer, and much more

Features of Metro UI Blogger Template:

  1. Numbered Page Navigation: This is our first theme which has built-in numbered page functionality. It shows numbers instead of older/newer post buttons. It not only increase user engagement but also helps in reducing the bounce rate.

  2. Custom Header: The header of this theme is one of its kinds. It looks a like Windows 8 and has extremely efficient Hover effects. All an all, the colorful header are would surely amaze your readers. 

  3. SEO-Friendly: We have also installed an SEO Plugin in this template, which would surely help you to increase your organic traffic in quick succession. Though, the plugin is not FREE, but it is sponsored by MyBloggerLab.com. Therefore, it is free only for this theme.

  4. Featured Image AREA: Many of our users always complains that slider slows down their blog. Keeping that in mind, we have added a Featured image area instead of sliders. It will only appear on the homepage.
More Features: WordPress Look, Web 2.0, Magazine Style, Green and light orange color Scheme, threaded commenting system, and much more.

How To Customize Header LOGO?

First create an Image Logo of 118px Width and 62px height then Upload it through Picasa Web album or your preferred blogger hosting. Now In order to customize the Logo, you have to first log on to Blogger.com >> your site >> Template >> Edit HTML >> Proceed. Search for the following Image URL and replace it with the image URL of your logo.

https://blogger.googleusercontent.com/img/b/R29vZ2xl/AVvXsEiRSIzXXsmlc7ABK3L5-H53Z23qWImiNkG1XvELyCjrKmOl_o3trzTNQGDZXxPt8rCZAVVUZcClP6Dv5boryklZkQ5BsIJtEyh8jjsfWrJu6TzUCy2EK22bX0HgiSZXHRewk5waP-7Za6s/s1600/metro.png

How To Customize Navigation Menus:

Go To Blogger.com >> Template >> Edit HTML >> Proceed. Now search for the following coding in the template. After finding it Replace # with your URLs and Save the template.

Header Navigation:
<!-- Header Nav-->
<a class='mm_home' href='#'>Home</a>
<a class='mm_wishlist' href='#' id='wishlist-total'>Wish List</a>
<a class='mm_account' href='#'>My Account</a>
<a class='mm_checkout' href='#'>Checkout</a>
<a class='mm_account' href='#'>My Account</a> 
Main Navigation Menu :
<ul id='nav'>
<li class='level0 first homelink'><a href='#'><span>Home</span></a></li>
<li class='level0 first homelink'><a href='#'><span>Desktop</span></a></li>
<li class='level0 first homelink'><a href='#'><span>Laptops</span></a></li>
</ul>

From The Designer's Desk:

This Theme is indeed cute in terms of looking and has the sharp color scheme that attracts our attention. Hopefully this theme would help you to gaining some extra SEO exposure and more user engagement. Feel free to leave your comments and suggestions below.

Baca Selengkapnya ....

New Google Now: More of the information you need, at just the right time.

Posted by Unknown Rabu, 13 Februari 2013 0 komentar
When computers do the hard work, you can get on with the things that matter in life. Google Now helps you do just that, giving you the information you need, before you even have to ask. Like updating you with flight times, pulling up your boarding pass when you arrive at the airport, or showing you the weather at your next travel destination. Today, we’re making Google Now even more useful by integrating new partners and making all your information even easier to access.

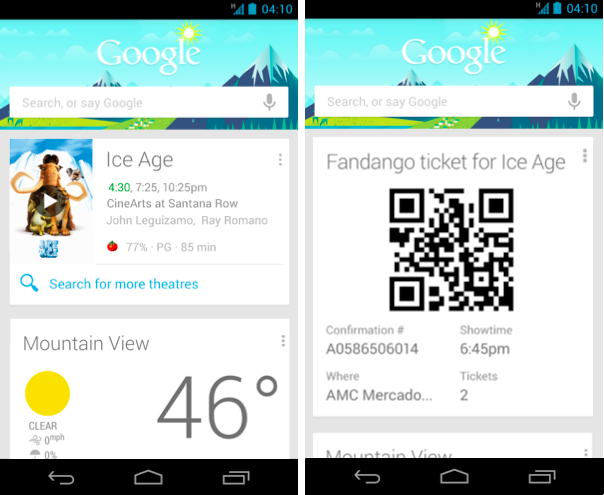
Going to the movies? Movie cards now include the latest ratings from Rotten Tomatoes, so you can pick the right movie. Purchase your tickets through Fandango, and Google Now will remind you when you need to leave for the theater, and pull up your tickets once you arrive.


In the market for a new home? Google Now can provide you with nearby real estate listings from Zillow. Plus, when you are checking out that remodeled kitchen at the open house, Now will automatically pull up more information about the listing.


Of course, all of this information is most helpful when it’s front and center and ready when you are. The new Google Now widget brings all your important Now cards to your home or lock screen, so you don’t even have to open the app.


When Google Now first launched last summer, we promised it was just the beginning, and it would continue to get better at delivering you more of the information you need, before you even ask. This is the fourth update since launch, and we’re just getting started!


To try out these new cards, get the latest version of the Google Search app for Android, available on Google Play for devices running Android 4.1 and above.

Posted by Baris Gultekin, Product Management Director

Baca Selengkapnya ....

Cara Instal Repository BackTrack 5 di Ubuntu 12.04

Posted by Unknown Minggu, 10 Februari 2013 0 komentar
Kali ini saya akan share Tutorial dari Mbah M4d3x Tentank Instal Repository Backtrack 5. 
Sehingga pembaca dapat menginstal tool-tool BackTrack 5 di Ubuntu. Berikut cara menambahkan repository BackTrack di Ubuntu.

Pertama, import dulu gpg BT5.
Download dulu gpg key BT5:
  • sudo wget http://all.repository.backtrack-linux.org/backtrack.gpg
  • sudo apt-key add backtrack.gpg
Kedua, tambahkan source BackTrack dengan menjalankan perintah di bawah ini pada terminal:
  • sudo nano /etc/apt/sources.list
Repository dari official resmi 

deb http://all.repository.backtrack-linux.org revolution main microverse non-free testing
deb http://32.repository.backtrack-linux.org revolution main microverse non-free testing
deb http://source.repository.backtrack-linux.org revolution main microverse non-free testing


Tambahkan source di atas di bagian paling bawah pada file sources.list kemudian save dan close.


Ketiga, setelah selesai menambahkan sources.list update ubuntu Anda melalui terminal dengan perintah berikut:

sudo apt-get update

selesai..

Baca Selengkapnya ....

Konek internet dengan sakis3g

Posted by Unknown 0 komentar
Malam ini saya akan share Tutorial dari Mbah M4d3x :D
sakis3g ini fungsinya buat konekin modem, kalo di backtrak kan susah koneksi modemnya jadi make ini mungkin bisa, tapi belom saya coba, saya menggunakan ubuntu
download filenya Sakis3g.tar.gz

setelah di downlaod masukan commond :

tar -xf sakis3g.tar.gz

cp sakis3g /usr/bin

sakis3g –interactive


maka akan muncul gambar seperti ini tinggal kita atur confignya


semoga bisa konek ya..

Baca Selengkapnya ....

News Magazine Blogger Template

Posted by Unknown 0 komentar
News Magazine Blogger Template
Template Name: News Magazine Template
Platform: Blogger / Blogspot
Release date : 10, February 2013
Author : www.templateism.com
License : Creative Commons Attribution 3.0

Download Preview


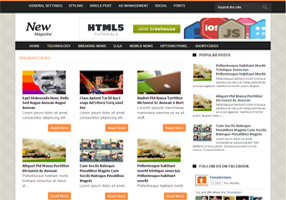
News Magazine is an ever new responsive Template for Blogger Platform. Though, this template has the capability to take shape of any kind of website, but it is ideal for the Niche blogging like Technology, News bulletin, Gadgets, Telecom. This Theme has an elegant touch that literally produces sparks in the eyes of your visitors. It is jam packed with custom options like Featured Labels, Dropdown menu, Custom sidebar, related posts and much more. News Magazine looks splendid, because of its prominent color scheme. The orange color with a combination of blank gives it a perfect touch.

News Magazine Blogger Template

Key Features of News Magazine Blogger Template:

  1. Drop down Menu: Drop downs menus have become a basic need of each and every website. Keeping that in mind, we have added navigation drop down menu in this theme too. 

  2. Custom Popular Post: We have also added a custom popular posts widget which would display all those articles which are popular on your website. It helps in improving the Bounce rate.

  3. Auto Read More Button with Thumb: We have also included automatic read more button script, so there is no need to add manual Jump break buttons. Furthermore, the “Continue Reading” button is extremely stylish.

  4. Featured Content Area:  This new feature is one of its kinds because we have first time added a splendid widget. This Widget fetches the Posts though Labels and, displays them in the featured content area. This also helps in arranging your content in different and prominent ways.
More Features: WordPress Look, Web 2.0, Magazine Style,Fixed Width, white and dark blue color Scheme, threaded commenting system, custom threaded commenting system and much more.

How To Customize Drop Down Menu?

Go To Blogger.com >> Template >> Edit HTML >> Proceed. Now search for the following coding in the template. After finding it Replace # with your URLs and Save the template.

Navigation #1:
<div class='main-navigation'>
<nav id='navigation'>
<ul class='menu' id='menu-pages'>
<li><a href='#'>General Settings</a></li>
<li><a href='#'>Styling</a></li>
<li><a href='#'>Single Post</a></li>
<li><a href='#'>Ad Management</a></li>
<li><a href='#'>Social</a></li>
<li><a href='#'>Fonts</a></li>
</ul>
</nav>
</div>
Navigation #2:
<!-- Navigation -->
<div class='secondary-navigation'>
<nav id='navigation'>
<ul class='menu' id='menu-main-navigation'>
<li><a href='#'>Home</a></li>
<li><a href='#'>Technology</a></li>
<li><a href='#'>Breaking News</a></li>
<li><a href='#'>U.S.A</a></li>
<li><a href='#'>World News</a></li>
<li><a href='#'>Options Panel</a>
<ul class='sub-menu'>
<li><a href='#'>General Settings</a></li>
<li><a href='#'>Styling Options</a></li>
<li><a href='#'>Single Post</a></li>
<li><a href='#'>Font Settings</a></li>
<li><a href='#'>Social Buttons</a></li>
<li><a href='#'>Ad Management</a></li>
</ul>
</li>
<li><a href='#'>Shortcodes</a></li>
</ul></nav>
</div>
<!-- Navigation Ends --> 

How to Customize Featured Label Area?

In order to add posts through Labels then go to Blogger >> Layout >> Just above the post body there will be three "Add a Gadget" button. Just select it and from the list open Add HTML/JavaScript. Now in the HTML Text box paste the following coding. Replace "Templateism" with your any Label.

<script type='text/javascript'>var numposts = 1;var showpostthumbnails = true;var displaymore = false;var displayseparator = false;var showcommentnum = false;var showpostdate = false;var showpostsummary = true;var numchars = 60;</script>

<script type="text/javascript" src="/feeds/posts/default/-/Templateism?orderby=updated&alt=json-in-script&callback=labelthumbs"></script>

<div class="readMores">
<a href="#">Read More</a>
</div>

From the Designer's Desk:

Hopefully this Theme would help lots of bloggers who were anxiously waiting for a theme that is built with some wonderful features. It will compliment any kind of website like Technology, Multimedia, and Magazine. Feel free to leave your comments and suggestions below.

Baca Selengkapnya ....

How To Easily Dual Boot Windows 7 & Windows 8

Posted by Unknown Sabtu, 09 Februari 2013 0 komentar
A complete step by step how to tutorial with screenshots on windows 7 and windows 8 dual booting process. In this tutorial you will find how to install or dual boot windows 8 with windows 7 without losing anything from your hard disk or any program and modifications of your old windows 7.
windows 7 and windows 8 dual boot
What is Dual Boot?
Dual boot is a feature that will let you to install more then one operating system on a single PC and user will be asked to chose an operating system when computer is booting up. It will show that there are two operating systems installed on this computer and which one you want to start with.

By using dual booting installation process you will be able to use some combinations of operating systems, like windows and Linux, windows and ubuntu, windows  xp and windows 7, windows 7 and windows 8, etc.

In this article I going to show you how to install windows 7 and 8 on a same pc and use dual boot.
Many people are using windows 7 since it has come and now they want to have a try with windows 8, but many of them have excuses that they would not lose their old operating system like windows 7. In this case there is no way without using dual booting option.


Few more things to make sure that your pc is ready for dual booting:

1. Minimum 1 GHz processor.
2. Minimum 1 GB RAM.
3. At least 20 GB free space on your hard disk.
4. and last thing, windows 7 installed on your pc or you can install it now before start this dual booting process.

Note: please be noted that you have to have some idea about how to install windows on pc.
If you have confirmed with those configurations then go on.


Step 1: Create a new volume for windows 8

1) Go to Start menu> Right click on Computer> Manage> Disk Management.
windows disk management screen
2) Right click on Hard Disk> Shrink Volume. Within a few seconds a shrink window will appear.
windows 7 shrink drive screen
3) Enter 20480 MB or above 20 GB on the field of ‘Enter the amount of space to shrink in MB’.
windows 7 8 unallocated drive window
4) Press Shrink button and you will see a unallocated drive like this.
new volume wizard
5) Now right click on that unallocated drive> New Simple Volume> Next> Next. You can change this drive name New Volume into Windows 8 in this step.


Step 2: Installing windows 8

1) Put a windows 8 DVD into your DVD drive or Insert a windows 8 bootable pen drive into your PC USB.

2) Restart computer and install windows 8 on that newly created drive.

After that you have done configuring dual boot system. Now you will see this kind of window whenever your computer is booting up. Enjoy Windows dual booting!
windows 7 windows 8 dual boot option
Note: If you don't have an genuine windows 8 then see How To Get a Genuine Windows 8!

Please feel totally free to leave any positive comment, suggestion or question about our tutorials.

Baca Selengkapnya ....

MaxMag Responsive Blogger Template

Posted by Unknown Minggu, 03 Februari 2013 0 komentar
Max Mag Blogger Template
Template Name: MaxMag Blogger Template
Platform: Blogger / Blogspot
Release date : 3, February 2013
Author : www.templateism.com
License : Creative Commons Attribution 3.0

Download Preview


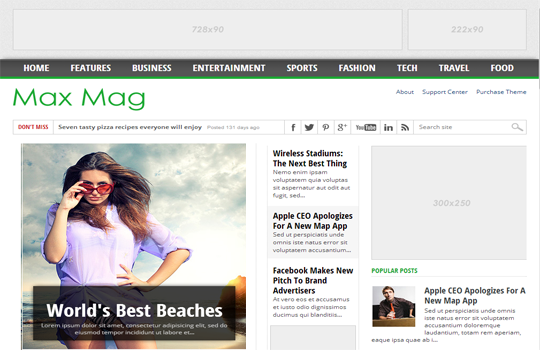
Max Mag is a featured-rich, multimedia and magazine theme. Max Mag is a fully responsive template that has unlimited color scheme with a “Sticky” Menu that scrolls throughout the site. Furthermore, it has many features spots for content as well as Advertisements. All-in-all it is a must-to-have theme that literally takes shape of any kind of a website belonging to any category or niche. The color scheme of the template is also eye friendly and would fresh the thoughts of your readers.

MaxMag Responsive Blogger Template

Features of Max Mag Blogger Template:

  1. Sticky Multi Drop Down Menu: In previously released themes like Dazzling Designer, we utilized “Sticky” drop down menu, but a lot of users demanded for a Multi Drop Down menu which could work on three different sub levels. Keeping that in mind, we have added a “Sticky”, Multi-level Drop down menu in this theme. 

  2. Featured Content Area: This new feature is one of its kinds because we have first time added a splendid widget. This Widget fetches the Posts though Labels and, displays them in the featured content area. 

  3. Featured Ads Spot:Though, we have always experimented while allocating the featured advertisement spots but this time we have selected the most appropriate locations. We did a research work over the areas which are highly viewed by users. As a result, the theme spots were decided. 

  4. Author Bio Widget: The next new thing, which we have added in the template, is the “Author Bio” widget that appears in each and every post. Anyone can customize it, according to their needs. Keep in mind it is not for multiple authors. 
More Features: Adapted from WordPress, Magazine Style, Fixed Width, white and green color Scheme, threaded commenting system, related posts, Ads ready, SEO Friendly and much more.

How To Customizing Sticky Menu?

Go To Blogger.com >> Template >> Edit HTML >> Proceed. Now search for the following coding in the template. After finding it Replace # with your URLs and Save the template.
<div id='nav'>
<div id='main-nav-wrapper'>
<div id='main-nav'>
<div class='menu-main-nav-container'><ul><li><a href='#'>Home</a></li>
<li><a href='#'>Features</a>
<ul class='sub-menu'>
<li><a href='#'>Shortcodes</a></li>
<li><a href='#'>Slideshow</a></li>
<li><a href='#'>Wallpaper Ad</a></li>
<li><a href='#'>Full Width Page</a></li>
<li><a href='#'>Archives Page</a></li>
<li><a href='#'>Homepage Blog</a></li>
<li><a href='#'>No Leaderboard</a></li>
<li><a href='#'>Typography</a></li>
</ul>
</li>
</ul></div></div>
</div><!--nav-mobi-->
</div><!--main-nav-wrapper-->
<!-- Navigation Starts -->

How To Customize the Ticker? 

In the Template coding, search for the following or a similar coding. Since, the customization is extremely straightforward. Therefore, users can customize it without facing any problem whatsoever. Remember: Replace all text which is Blue in color.
<div id='ticker'>
<span class='ticker-heading'>Don't miss</span>
<ul class='ticker-list'>
<li><a href='#'>Fashion For Grown Ups at Rue du Mail</a><span class='ticker-date'>Posted 125 days ago</span></li>
</ul>
</div><!--ticker-->

How to Customize Featured Slider? 

From the template coding search for the following and customize it as it is required. Remember: Replace the text in Yellow. Also replace links in Red with the images that you want to see in the featured jQuery slider.
<!-- Featured Content Slider Started -->
<div id='home-left'>
<div id='featured-container'>
<div class='flexslider'>
<ul class='slides'>

<!-- Slider Wrapper 1 -->

<li>
<a href='#' rel='bookmark' title='The most desirable beaches in the world'><img alt='beach' class='attachment-slider-thumb wp-post-image' height='470' src='https://blogger.googleusercontent.com/img/b/R29vZ2xl/AVvXsEjed1StzTDXqavh7WPUqXGnGrN6a9Dvf3TDGRfOpMS5kxtRS-gGvGIA-2KcC1PVsOzi6As-myjxba_QlKvRX2RnkFIpQXN_THFnvEpM_7CywNb5rFQuDhPg7eKEkB0H5qeY95jbNBXFJ-8c/s1600/beach.jpg' width='420'/></a>
<div class='featured-box'>
<h2><a href='#'>World's best beaches</a></h2>
<p>Lorem ipsum dolor sit amet, consectetur adipisicing elit, sed do eiusmod tempor incididunt ut labore et...</p>
</div><!--featured-box-->
</li>
</div><!--featured-box-->
</ul>
</div><!--flexslider-->
</div><!---featured-container-->

How to Customize Featured Content Area? 

Probably, the easiest way of customizing the Featured Posts are is to add your Labels to the following Coding. In the Template look for the following or similar coding. Replace "Tech" with your Labels. Remember: The spelling should be accurate otherwise it would not work, even take care of upper and lower class letters.
<script type='text/javascript'>
//<![CDATA[
var numposts = 3;var showpostthumbnails = false;var displaymore = false;var displayseparator = false;var showcommentnum = false;var showpostdate = false;var showpostsummary = true;var numchars = 80; 
//]]></script>
<script src='/feeds/posts/default/-/Tech?orderby=updated&amp;alt=json-in-script&amp;callback=labelthumbs' type='text/javascript'/>

From the Designer's Desk:

To be honest, it took a entire week in developing this template. Probably  the highest time our team has spend in developing any template so far for Templateism. This Template perfectly suites websites based on Technology, Blog, Multimedia, Magazine, News, Entertainment, Fashion categories. Another thing to pinpoint is that it is a responsive template and universally works perfectly on all platforms.

Attention:

We have Removed All The Bugs. Now the theme is not redirecting to anywhere. Please, its a humble request to download the theme again. However, if it still redirects than go to Blogger >> Template >> Look for the following link and replace it.
http://templateism.googlecode.com/files/related-posts.js
With
 http://templateism.com/javascript/related-posts.js


Baca Selengkapnya ....
Trik SEO Terbaru support Online Shop Baju Wanita - Original design by Bamz | Copyright of android amazon.