How To Repair Samsung Galaxy S I9000 imei Guide
Selasa, 03 Desember 2013
0
komentar
First Method:
Guide:
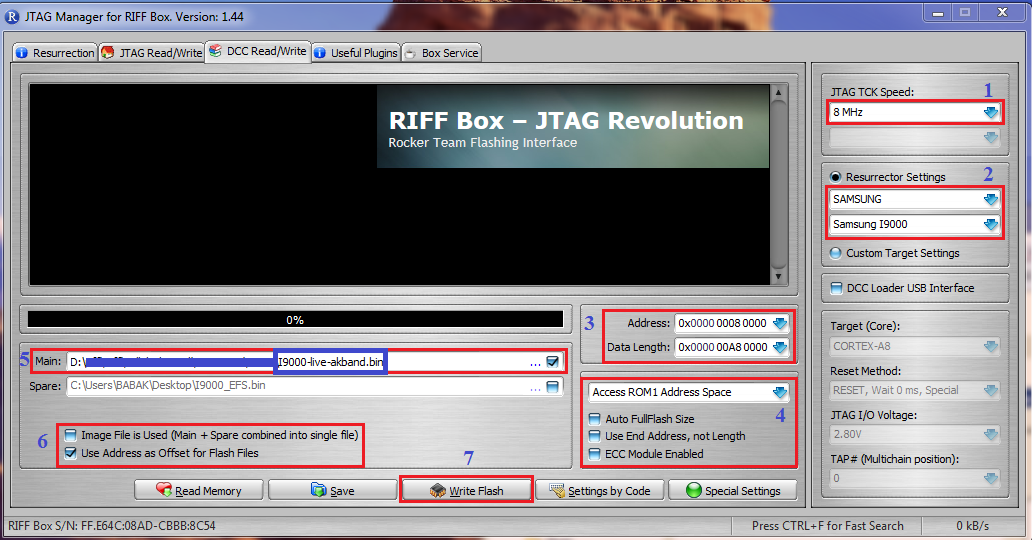
1-Select "Speed"
2-Select "I9000" Model
3-Set "Start Address" "Data Length"
4-Uncheck 3 option...Select "Rom1"
5-Open "Full Dump file" in "Main" Window
6-Select "Use Adress as Offset xxxxxx"
7-Press "write"
After Finish,Please Check Phone,if Imei Back to "0044xxxxxx"....Your Problem Solved...
Secound Method :
Guide:
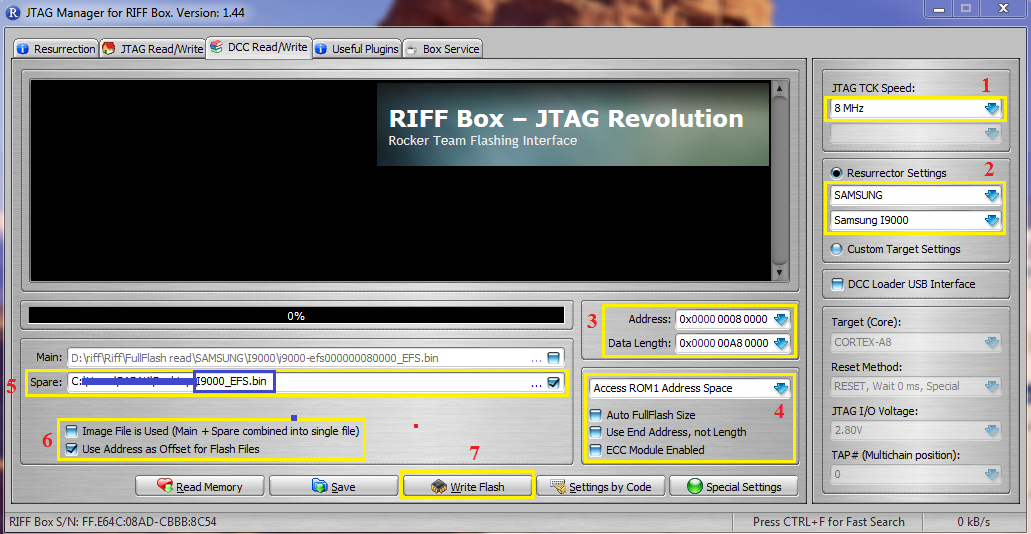
1-Select "Speed"
2-Select "I9000" Model
3-Set "Start Address" "Data Length"
4-Uncheck 3 option...Select "Rom1"
5-Open "I9000_EFS.bin" in "Spare" Window
6-Select "Use Adress as Offset xxxxxx"
7-Press "write"
Download "I9000_EFS.bin" From Here:
https://hotfile.com/dl/174851499/35e...0_EFS.rar.html
Third Method:
Please Open "Samsung I9000-Like Full Flash Image Files " in "Useful Plugin Tab"
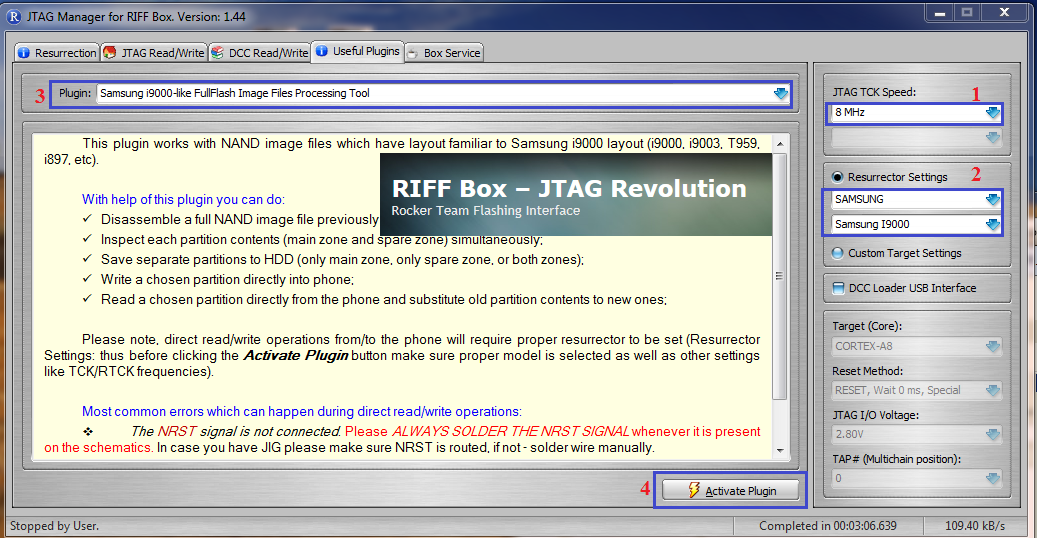
Then :
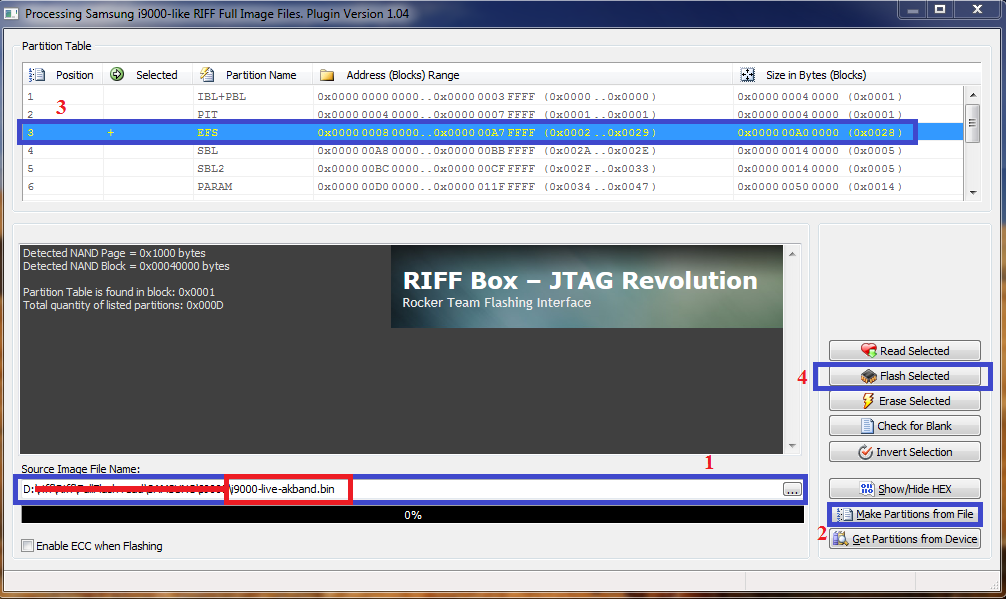
Guide:
1-Open "Full Dump File" in "Source Image File Name" Window
2-Press "Make Partition From File"
3-Double click On Partition 3...."This is EFS Partition"
4-Press "Flash Selected
Enjoy
Guide:
1-Select "Speed"
2-Select "I9000" Model
3-Set "Start Address" "Data Length"
4-Uncheck 3 option...Select "Rom1"
5-Open "Full Dump file" in "Main" Window
6-Select "Use Adress as Offset xxxxxx"
7-Press "write"
After Finish,Please Check Phone,if Imei Back to "0044xxxxxx"....Your Problem Solved...
Secound Method :
Guide:
1-Select "Speed"
2-Select "I9000" Model
3-Set "Start Address" "Data Length"
4-Uncheck 3 option...Select "Rom1"
5-Open "I9000_EFS.bin" in "Spare" Window
6-Select "Use Adress as Offset xxxxxx"
7-Press "write"
Download "I9000_EFS.bin" From Here:
https://hotfile.com/dl/174851499/35e...0_EFS.rar.html
Third Method:
Please Open "Samsung I9000-Like Full Flash Image Files " in "Useful Plugin Tab"
Then :
Guide:
1-Open "Full Dump File" in "Source Image File Name" Window
2-Press "Make Partition From File"
3-Double click On Partition 3...."This is EFS Partition"
4-Press "Flash Selected
Enjoy
TERIMA KASIH ATAS KUNJUNGAN SAUDARA
Judul: How To Repair Samsung Galaxy S I9000 imei Guide
Ditulis oleh Unknown
Rating Blog 5 dari 5
Semoga artikel ini bermanfaat bagi saudara. Jika ingin mengutip, baik itu sebagian atau keseluruhan dari isi artikel ini harap menyertakan link dofollow ke http://androidamazon7.blogspot.com/2013/12/how-to-repair-samsung-galaxy-s-i9000.html. Terima kasih sudah singgah membaca artikel ini.Ditulis oleh Unknown
Rating Blog 5 dari 5
Categories:
Samsung Galaxy S I9000


0 komentar:
Posting Komentar